Sometimes you may want to override the default DNS settings (DNS = Domain Name Server) on your computer so you can specify which DNS server is used. Most home users have this set to “automatic” and the DNS is provided by the user’s ISP, but you can use any DNS you like.
Here is How to Change DNS Settings
- STEP 1: At first, open Control Panel, then click Network and Internet.
- STEP 2: Click the Network and Sharing Center item.
- STEP 3: Look in the left margin and click the Change adapter settings link.
- STEP 4: From the Network Connections window that’s now on screen, find and double-click on the network connection that you use to connect to the Internet. Click on the Properties button.
- STEP 5: Then select Internet Protocol Version 4 (TCP/IPv4) and go to Properties button.
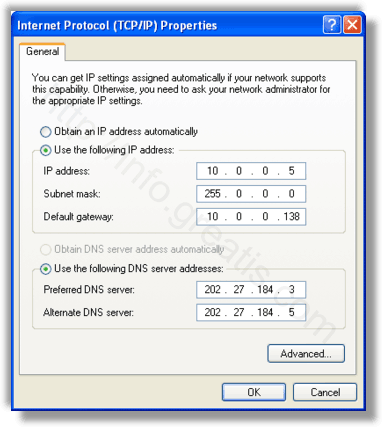
- STEP 6: You will see a window like the one below – this is the Internet Protocol window. Select Use the following DNS server addresses and enter the desired DNS server(s) in the space(s) provided.
Note: To add more DNS servers, click Advanced then the DNS tab.