In Windows, you will see an option called Add to dictionary in various software like Microsoft Word, different Note taking apps, web browsers, and so on. Whenever you add a word to the spell checking dictionary, it gets saved automatically and lets you ignore that word when you check for spelling mistakes the next time. This article will let you add or remove words from spell checking dictionary on Windows 10.
Sometimes, we write a particular word multiple times and Windows may not be able to recognize and it will point out that word as an error. When you know that the spelling of the word that you have written is correct, to avoid this irritation, you may choose the Add to dictionary or Ignore option to get rid of the red underline mark. Ignoring will happen just once, but if you think you will need to constantly use this word, then it is best to add the word to the dictionary. But there may come a time when you may want to remove that word.
This post will show you how to add, edit or remove words from the default spell checking Dictionary of Microsoft Office on your Windows 10/8/7 computer.
Here is How to Remove Words from Spell Checking Dictionary on Windows 10:
- STEP 1: To do so, navigate to the following path:
C:\Users\
\AppData\Roaming\Microsoft\Spelling
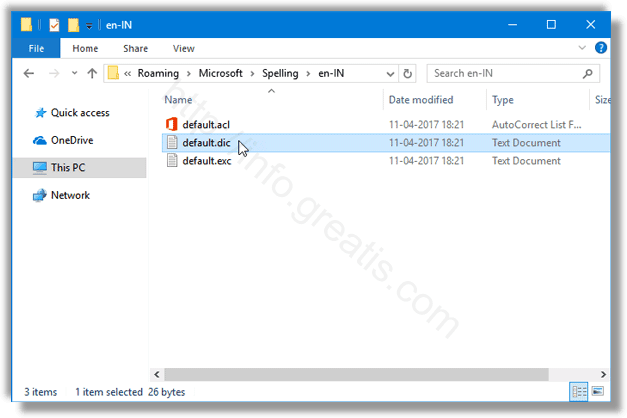
Here, C drive defines your system drive or where the Windows is installed and is your username. - STEP 2: In the Spelling folder, you will find one or more than one folders. If you have used more than one languages on your system, you will find more than one folders in this Spelling folder.
- STEP 3: Choose a folder based on the language you have used previously. In each folder, you can find three different files called default.acl, default.dic, and default.exc.

- STEP 4: Double click on the default.dic file to open it with Notepad. You will find all the words that you have added to your spell checking dictionary. Now, you can add a new word, edit an existing word or remove an existing word from this file.